
Tuesday, July 24, 2012
A Kunzea Capitata Bonsai
Kunzea is a specie endemic to Australia. Of the 36 varieties of Kunzea only one, Kunzea Ericoides, occurs ourside Australia, in New Zealand. I have not seen nor heard of anyone having a bonsai of this specie outside my garden. I have a few, this is the best. It was trained from an ordinary nursery stock since 2001. It blooms in winter/spring with masses of fluffy pink flowers. However, due to the constant prunning to keep it in shape, it is difficult to get it to bloom as a bonsai. The only way is to allow the branches to grow if one wants to see the flowers. I am letting the lower branch to grow, not for the flowers but to help it thicken up. The moment it is of the right size, I will cut it back. The style is copied from a Japanese master piece which won the top Kokufu prize many years back. It depicts an elderly person struggling on with life. CJ.


Sunday, July 8, 2012
My smallest NZ Tea Tree Bonsai Is Blooming
Well, my smallest NZ Tea Tree bonsai is still alive and blooming. 2 inches tall in a self made pot. Created in 2007. I hope to keep it alive for as long as possible. Not an easy task ! CJ.


Wednesday, July 4, 2012
Developing Two Trees In One
I have about 17 varieties of Tea Trees in my garden. So a fair bit of cross pollinations take place. This tea tree grow by itself about 4 - 5 years ago. The foliages and flowers are different from any tea trees I have in my garden. So I presume it must have been a result of cross pollinations. Who are the parents, I am not sure. I have yet to see something similar in any of the nurseries I visited. Anyway today I worked on it. My idea was to develop two bonsai out from this one tree in the next few years. One styled broadly in the shape of a deciduous tree and the other taller and more in the outline of a conifer. My plan is to grow the tree until the trunk is 3 - 4 times the current size. Then I will then airlayer the upper "conifer" part. Today I cleaned up the unnecessay branches and twigs and roughly wired the two trees into position. CJ.
The tree before work:

The tree after work:

The "deciduous" part:

The "conifer" part:

My visions in 10 years time:


The tree before work:

The tree after work:

The "deciduous" part:

The "conifer" part:

My visions in 10 years time:


Tuesday, July 3, 2012
My Bonsai Tools - Part 2
As my bonsai collection grows and my bonsai skill and artistry deepen, I naturally progress into carving. There are manual and power carving tools. The thing I like about manual carving is they don't stir up the dusts and dirts which power carving generated. Of course they are also much slower. So if u have a big carving job, it helps to invest in a power carver. Here are some of my carving tools:
My manaul carvers. From left to right. 3 Swiss concave wood carvers, 1 Chinese concave wood carvers, 1 Japanese wood carver, set of small carvers. Japanese carver.

These are my power carving tools. These tools are very powerful and dangerous at the same time. So be careful and take the necessary precautions. Wear safety gears. Be alert. Don't overstretch. Don't rush. Keep work area tidy and clear of unncessary items. Prevent accidental start. Ensure bits are tightened. Don't force. Switch off the equipment when you are not using it.

From left to right. A USA made Lancelot carver on a Makita angle grinder. This is extremely good in removing huge chunks of wood. I used this to help Bill Valvanis removed a huge chunk of wood from a large Juniper he was working on, while he was in Perth last year. The teeth is very much like those of a chain saw. So sharpening it, is similar to sharpening a chain saw. Next is an Arbortech Mini carver with a tungsen carbid cutting wheel. Good for the smaller jobs. Next is a Makita Die Grinder. The bits I bought from Kaisen on the Internet are the best. Sharp and really stainless. The ones I bought from another dealer in Europ are sharp but somehow the bits get tainted like the bits I bought from Taiwan. The Taiwanese bits are half the price and do the job as well as the more expensive ones. So if u are in Taiwan, pick up some of these Taiwanese carving bits.Next is a Dremer for the smaller jobs. The bits are from Europe, Japan and Australia. The original Dremer bits are not so good.
Sharpening of Scissor.
The scissor has two blades. The inside contact surfaces of the blades are flat and the other side at an angle. I used to sharpen on a wet stone but find this a little cumbersome. I found the diamond coated file sold at kitchenwhare shop to be easier to use. I go thru the angle side 20 - 30 times follow by 3 - 5 times on the flat side. A close contact between the two cutting edges is essential to have a good cut. 3 - 5 strokes in one direction should be sufficient to remove the burrs, without wearing off too much of the contact surface. Try to maintain the original angle of the cutting edge. The secret to sharpening is to get the cutting edge sharp with minimal lost of material. In this way the scissor is not only sharp but last for a long time.
Sharpening of branch cutter.
The branch cutter has two blades. One will overlap the other. I sharpen by going over the outside surface of the blade what overlap the other, 20 - 30 times with a diamond coated flat file. I then go thru the inside contact surface 3 - 5 times to remove the burrs. For the other blade I will go thru the non-contact surface 20 -30 times and 3 - 5 times on the contact surface. Maintain the original cutting angle.
Sharpening of concave and knob cutter.
These are more difficult to sharpen. I used a small piece of fine sand paper to go over the blade in the same sequence as that of branch cutter. The secret here is to maintain even pressure while going over the surface of the blade. Follow the original contours and angle of the cutting edge.
I tried to clean and maintain my tools immediately after use. If need be I will oil the joins and moving parts. In this way not only will my tools last for a long time but the job will be easier and the feeling good.
My manaul carvers. From left to right. 3 Swiss concave wood carvers, 1 Chinese concave wood carvers, 1 Japanese wood carver, set of small carvers. Japanese carver.

These are my power carving tools. These tools are very powerful and dangerous at the same time. So be careful and take the necessary precautions. Wear safety gears. Be alert. Don't overstretch. Don't rush. Keep work area tidy and clear of unncessary items. Prevent accidental start. Ensure bits are tightened. Don't force. Switch off the equipment when you are not using it.

From left to right. A USA made Lancelot carver on a Makita angle grinder. This is extremely good in removing huge chunks of wood. I used this to help Bill Valvanis removed a huge chunk of wood from a large Juniper he was working on, while he was in Perth last year. The teeth is very much like those of a chain saw. So sharpening it, is similar to sharpening a chain saw. Next is an Arbortech Mini carver with a tungsen carbid cutting wheel. Good for the smaller jobs. Next is a Makita Die Grinder. The bits I bought from Kaisen on the Internet are the best. Sharp and really stainless. The ones I bought from another dealer in Europ are sharp but somehow the bits get tainted like the bits I bought from Taiwan. The Taiwanese bits are half the price and do the job as well as the more expensive ones. So if u are in Taiwan, pick up some of these Taiwanese carving bits.Next is a Dremer for the smaller jobs. The bits are from Europe, Japan and Australia. The original Dremer bits are not so good.
Sharpening of Scissor.
The scissor has two blades. The inside contact surfaces of the blades are flat and the other side at an angle. I used to sharpen on a wet stone but find this a little cumbersome. I found the diamond coated file sold at kitchenwhare shop to be easier to use. I go thru the angle side 20 - 30 times follow by 3 - 5 times on the flat side. A close contact between the two cutting edges is essential to have a good cut. 3 - 5 strokes in one direction should be sufficient to remove the burrs, without wearing off too much of the contact surface. Try to maintain the original angle of the cutting edge. The secret to sharpening is to get the cutting edge sharp with minimal lost of material. In this way the scissor is not only sharp but last for a long time.
Sharpening of branch cutter.
The branch cutter has two blades. One will overlap the other. I sharpen by going over the outside surface of the blade what overlap the other, 20 - 30 times with a diamond coated flat file. I then go thru the inside contact surface 3 - 5 times to remove the burrs. For the other blade I will go thru the non-contact surface 20 -30 times and 3 - 5 times on the contact surface. Maintain the original cutting angle.
Sharpening of concave and knob cutter.
These are more difficult to sharpen. I used a small piece of fine sand paper to go over the blade in the same sequence as that of branch cutter. The secret here is to maintain even pressure while going over the surface of the blade. Follow the original contours and angle of the cutting edge.
I tried to clean and maintain my tools immediately after use. If need be I will oil the joins and moving parts. In this way not only will my tools last for a long time but the job will be easier and the feeling good.
Tuesday, June 26, 2012
My Bonsai Tools - Part 1.
Over the last few days when it was cold and raining I stayed indoor to clean and sharpen my bonsai tools.
When I first started bonsai in 1978, I had a general gardening scissor, a snap cutter, a small saw and a plier. These were my bonsai tools. Total cost not more than $10. Today you can still get these tools for under $10. Recently I picked up a snap cutter for $1. The quality is not that good but it works. A plier is about $2. A general gardening scissor and a small saw for a few $ each. So basic bonsai tools are not expensive. I believe many ordinary people in Asia are still doing their bonsai with these basic tools. Where there is passion, good bonsai can be produced with simple basic tools. The passion is primary and the tools secondary.
These were my first bonsai tools:

Two years later, I bought a set of Japanese carbon steel tools for Sing$50, from a Japanese master by the name of Suzuki who set up shop in Singapore. Last I heard he was into landscaping which is a more lucrative business in Singapore, with so many hotels and expensive homes. I have been using this set of tools until 2004 when I went on a bonsai tour in Japan and so took the opportunity to pick up some good stainless steel Japanese bonsai tools. The $50 set consisted of a small branch cutter, a small concave cutter, a regular shear, a long handle shear, a trimming scissor, a wire cutter, a plier, a spring assisted trimming shear and a broom brush. I have misplaced or lost the concave cutter, the regular shear and the trimming scissor. All the other tools are still in good working conditions. That $50 must have been the best $50 I ever spent in my life. Good values and fun over 20 years ! Of course proper care and maintenance are essentials to keep your tools in good condition so that they can last. So if you can afford it, get a decent set of bonsai tools. They not only improve the productivity and quality of your bonsai works but also spur you on. It feels good to be working with professional tools.
What remains of my first set of bonsai tools:

Today I have more tools than I needed. I have three sets of stainless steel tools, including a set of still unuse Masakumi.
Here are part of my current set of bonsai tools:

Should u want to equip yourself with a set of bonsai tools my suggestion is to get
1. A concave cutter - this should handle the branches and all the unwanted bulges on the tree.
2. A pruning shear - to handle the twigs and leave.
3. A trimming shear - for finner foliage works.
4. A plier - for bending wires.
5. A wire cutter.
6. A saw for the larger cuts.
7. A brush for tidying up.
8. A twizzer for weeding.
Of course as your passion grows and your bonsai works get more specialised and complicated then you may have to look into getting tools like:
Branch bender:

Trunk splitter:

Root cutter:

My recommendation is to buy good quality tools. Where it is made and the price is no indication of quality and reliability. The best is to rely on recommendations from friends who have used these tools before. I bought the following tools blindly and paid for my mistakes. The first was a small Japanese cutter. After a year the spring snapped. The second is a Chinese made stainless steel knob cutter. After 6 months, the cutting edges misaligned. The third is most disappointing. It is an expensive pair of Japanese stainless steel scissor which was supposedly to be made of a new and better material. The cutting edges wore off faster than normal and it rusted. The last is a small "Made in Japan" cutter, bought from an American dealer on the Internet. Less that 6 months, the cutting edges misaligned. I really wonder whether it is Made in Japan as carved onto the tool.

In Part 2 I will cover my carving tools and maintenance and sharpening of tools. CJ
When I first started bonsai in 1978, I had a general gardening scissor, a snap cutter, a small saw and a plier. These were my bonsai tools. Total cost not more than $10. Today you can still get these tools for under $10. Recently I picked up a snap cutter for $1. The quality is not that good but it works. A plier is about $2. A general gardening scissor and a small saw for a few $ each. So basic bonsai tools are not expensive. I believe many ordinary people in Asia are still doing their bonsai with these basic tools. Where there is passion, good bonsai can be produced with simple basic tools. The passion is primary and the tools secondary.
These were my first bonsai tools:

Two years later, I bought a set of Japanese carbon steel tools for Sing$50, from a Japanese master by the name of Suzuki who set up shop in Singapore. Last I heard he was into landscaping which is a more lucrative business in Singapore, with so many hotels and expensive homes. I have been using this set of tools until 2004 when I went on a bonsai tour in Japan and so took the opportunity to pick up some good stainless steel Japanese bonsai tools. The $50 set consisted of a small branch cutter, a small concave cutter, a regular shear, a long handle shear, a trimming scissor, a wire cutter, a plier, a spring assisted trimming shear and a broom brush. I have misplaced or lost the concave cutter, the regular shear and the trimming scissor. All the other tools are still in good working conditions. That $50 must have been the best $50 I ever spent in my life. Good values and fun over 20 years ! Of course proper care and maintenance are essentials to keep your tools in good condition so that they can last. So if you can afford it, get a decent set of bonsai tools. They not only improve the productivity and quality of your bonsai works but also spur you on. It feels good to be working with professional tools.
What remains of my first set of bonsai tools:

Today I have more tools than I needed. I have three sets of stainless steel tools, including a set of still unuse Masakumi.
Here are part of my current set of bonsai tools:

Should u want to equip yourself with a set of bonsai tools my suggestion is to get
1. A concave cutter - this should handle the branches and all the unwanted bulges on the tree.
2. A pruning shear - to handle the twigs and leave.
3. A trimming shear - for finner foliage works.
4. A plier - for bending wires.
5. A wire cutter.
6. A saw for the larger cuts.
7. A brush for tidying up.
8. A twizzer for weeding.
Of course as your passion grows and your bonsai works get more specialised and complicated then you may have to look into getting tools like:
Branch bender:

Trunk splitter:

Root cutter:

My recommendation is to buy good quality tools. Where it is made and the price is no indication of quality and reliability. The best is to rely on recommendations from friends who have used these tools before. I bought the following tools blindly and paid for my mistakes. The first was a small Japanese cutter. After a year the spring snapped. The second is a Chinese made stainless steel knob cutter. After 6 months, the cutting edges misaligned. The third is most disappointing. It is an expensive pair of Japanese stainless steel scissor which was supposedly to be made of a new and better material. The cutting edges wore off faster than normal and it rusted. The last is a small "Made in Japan" cutter, bought from an American dealer on the Internet. Less that 6 months, the cutting edges misaligned. I really wonder whether it is Made in Japan as carved onto the tool.

In Part 2 I will cover my carving tools and maintenance and sharpening of tools. CJ
Wednesday, June 20, 2012
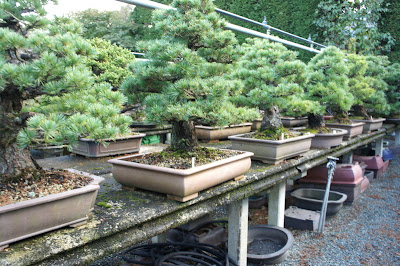
A visit to Takasago-an.
The highpoint of last year's 11th Aspac Exhibition and Convention in Takamatsu was a visit to Takasago-an on the last day, to conclude a massively successful event. I am sure most of the about 1,000 participants from all over the world, like me, went home happy and satisfied. Takasago-an is the World renowned bonsai garden cum residence of the late and well-like Daizo-Iwasaki. Besides the numbers of award winning bonsai and master pieces, there are about 500 top class bonsai. I found a new meaning to addiction to bonsai. Here are some photos to share the beauty of this massive and impressive collections. CJ.




Saturday, June 16, 2012
Work to Improve a Shohin Wild Olive Bonsai
This shohin wild olive was dug about 7 - 8 years ago. It is 17 cm tall and the base is 8 cm. Yesterday I spend 1.5 hours working on this fella.
This is how it looked like before work begins.

First I cut of this chunk with a saw.

Then I used my Dremel to carve the trunk into shape.

Today I spend another 1.5 hours working on the tree. I did some detailed carvings and then wired. The tree will now be rested for it to recover. Always remember the survival of the tree is paramount. So try not to do too much nor push too hard. If the tree is dead, all your years of efforts will be wasted.
Then I will feed it heavily to improve the ramifications. They are very greedy and love an inch or two of dynamic lifter. Use the 2 x 2 approach to improve the branch structure. Basically 2 x 2 involves cutting a growing branch at the right place, to induce two new branches to grow. The process is repeated. So from 1, u get 2. From 2 u get 4. From 4 u get 8 branches.
Next is to put it into a nice pot. I am currently thinking of putting it into a round terracota pot of 6 - 8 cm thick by 10 - 12 cm wide. Round pots generally go well with small trees. Of course the best approach is to get a few pots, put the tree into each and then decide. Pot selection is just like chosing a dress. Does it looks good ? Always remember the pot must enhance the beauty of the tree.
The tree after 3 hours of work.

A closed-up of the detailed carving.

These are the carving tools I used. A Dremel with 5 different type of bits. The first on the left was bought on the internet. 2nd to 4th was bought from a Japanese Shohin Bonsai Master who has these specially made for himself. He was very kind to let me have one set. The last is a Dremel bit which can be bought from Dremel dealers. CJ.

This is how it looked like before work begins.

First I cut of this chunk with a saw.

Then I used my Dremel to carve the trunk into shape.

Today I spend another 1.5 hours working on the tree. I did some detailed carvings and then wired. The tree will now be rested for it to recover. Always remember the survival of the tree is paramount. So try not to do too much nor push too hard. If the tree is dead, all your years of efforts will be wasted.
Then I will feed it heavily to improve the ramifications. They are very greedy and love an inch or two of dynamic lifter. Use the 2 x 2 approach to improve the branch structure. Basically 2 x 2 involves cutting a growing branch at the right place, to induce two new branches to grow. The process is repeated. So from 1, u get 2. From 2 u get 4. From 4 u get 8 branches.
Next is to put it into a nice pot. I am currently thinking of putting it into a round terracota pot of 6 - 8 cm thick by 10 - 12 cm wide. Round pots generally go well with small trees. Of course the best approach is to get a few pots, put the tree into each and then decide. Pot selection is just like chosing a dress. Does it looks good ? Always remember the pot must enhance the beauty of the tree.
The tree after 3 hours of work.

A closed-up of the detailed carving.

These are the carving tools I used. A Dremel with 5 different type of bits. The first on the left was bought on the internet. 2nd to 4th was bought from a Japanese Shohin Bonsai Master who has these specially made for himself. He was very kind to let me have one set. The last is a Dremel bit which can be bought from Dremel dealers. CJ.

Sunday, June 10, 2012
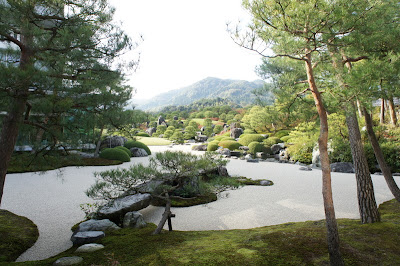
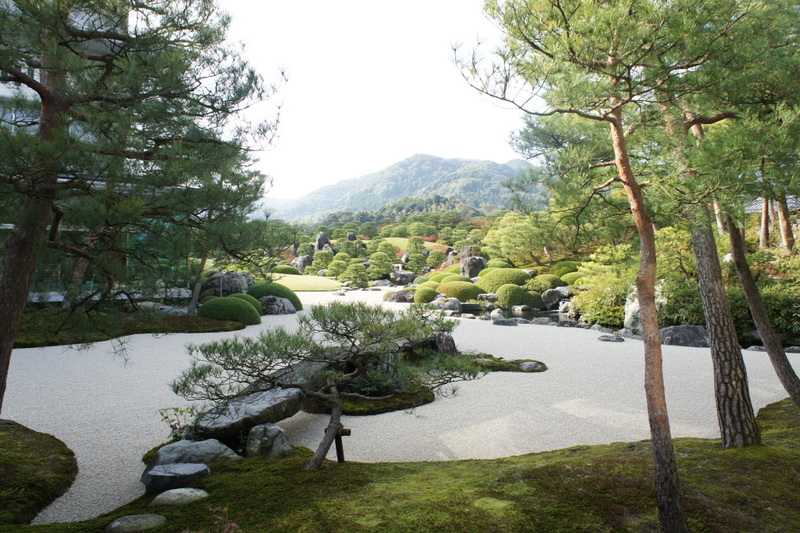
Adachi Museum of Art
In Nov last year I attended the 11th Aspac convention in Japan. As part of my tour, we visited the Adachi Museum of Art. They have a very impressive collections of paintings. However what impresses me most is the Garden. Exquisite ! The best I have seen so far. No wonder it was honoured as the best Japanese Garden for eight consecutive years by the Journal of Japanese Gardening. Some photos to share the beautiful scenaries.





Subscribe to:
Posts (Atom)